

Sunday, 31 December 2017
Friday, 29 December 2017
Caroline Ransel

Caroline RSL
IDR 289.900
Pertanyaan & order bisa lewat:
Direct message account ini atau
Line@: @misyellestore (pakai @)
WA : 0851-0599-9158
Ayo tunggu apalagi sis? 😊
IDR 289.900
Pertanyaan & order bisa lewat:
Direct message account ini atau
Line@: @misyellestore (pakai @)
WA : 0851-0599-9158
Ayo tunggu apalagi sis? 😊
Year End Voucher

Year end voucher worth IDR 50.000 for all items at Misyelle Store.
Follow our instagram Misyellelovers, share your picture with our product, give #misyellestore, and get instant voucher which can be used directly!
Find Our Store at :
BIP (Bandung Indah Plaza)
BTC Fashion Mall
Istana Plaza
Miko Mall
Thursday, 28 December 2017
New Year Promo

Come to our MSY Brands Store and get 20% off all items. This promo is not for long, so hurry up!
Find Our Store at :
BIP (Bandung Indah Plaza)
BTC Fashion Mall
Istana Plaza
Miko Mall
Wednesday, 27 December 2017
Free Voucher

Surprise!!
Free Voucher worth IDR 50.000 only for you. See our newest catalog and use your voucher right now.
www.misyelle.com
Tuesday, 26 December 2017
no-sew clutch
DIY – The easiest no-sew clutch
August 21, 2012
I love to create easy but beautiful projects. It’s nice to create something that doesn’t cost a lot of time or money but does look beautiful. This clutch is an example of such a project. It’s easy, cheap and pretty! It even gives you the chance to upcycle some stuff. I hope you enjoy making and wearing this clutch!
Learn how to make the easiest no-sew clutch including step by step pictures after the jump. . .
– Craft glue (I recommend Aleene’s 8 oz. Original Tacky Glue)
– Thrifted leather belt
– Dollar store place mat
– Scissors
– Clothespins
– Cropodile

How to create the easiest no-sew clutch
1. Find a belt and a place mat that go well together.
2. Fold the place mat while leaving about 4 inch on top to fold over the opening of your clutch. Glue the sides and use clothespins to keep material in place while it’s drying. Remove the clothespins when the glue is dry.
3. Fold the belt around the clutch and decide on the length of the belt. Cut off the leather. Now decide where the holes should go. I made two holes. One for an almost empty bag and one for when it’s a little bit more filled.
4. Use your Cropodile to punch to holes in the leather belt.
5. Glue down the belt on your bag. You only need to glue down the part of the belt that’s on the back of your clutch. Use something heavy to press the glued surfaces down.
6. Close your belt and your beautiful and easy no-sew clutch is ready
source
Monday, 25 December 2017
Best Wishes

Merry Christmas and Happy New Year to all Misyellelovers!
Wish you all the best for New Year. New plans, new goals, and new collection exactly.
Stay tune, Misyellelovers
Love,
Misyelle
Sunday, 17 December 2017
Misyelle Christmas Sale

Christmas is approaching, Misyellelovers! Find a perfect gift for your lovely one only at Misyelle
Check it out NOW :
www.misyelle.com
Pertanyaan & order bisa lewat:
Direct message account ini atau
Line@: @misyellestore (pakai @)
WA : 0851-0599-9158
Ayo tunggu apalagi sis? 😊
post foto kamu dengan Misyelle dan tag #misyellelovers
#misyellelovers #misyellestore #msystore #misyelleshoes #misyellebags #taswanita #taswanitamurah
#taswanitamurah #taswanitabranded #taswanitaimport #taswanitaterbaru #taswanitalucu #taswanitamurmer #taswanitacantik #taswanitabaru
#taswanitakerja #taswanitamurahbanget
#taswanitamurahberkualitas
Thursday, 14 December 2017
FREE SQUISHY From Misyelle

Punya tas/sepatu Misyelle? Yuk post foto terbaikmu bersama produk Misyelle, follow dan tag IG Misyelle : Misyellelovers, kemudian beri hashtag #misyellestore #showmeyourmisyelle dan dapatkan FREE Squishy yang lucu ini.
syarat dan ketentuan berlaku
* Squishy dapat diambil di Misyelle Store BIP
* Hanya untuk 50 foto terbaik yang dipilih oleh pihak Misyelle
* Keputusan Misyelle tidak dapat diganggu gugat
Wednesday, 13 December 2017
DIY Makeup Bag
his bag has to be one of my all time favorite sewing projects. It
was one of my first ventures into sewing other than my burp cloths. I
wanted to hand-make some of my bridesmaid gifts for my wedding, so I
made 5 tote bags (I’ll have to share that later) and 10 little makeup
bags. The makeup bags were for my bridesmaids and house party and since
I was making 10 of them, I didn’t make myself an extra. Well, now its
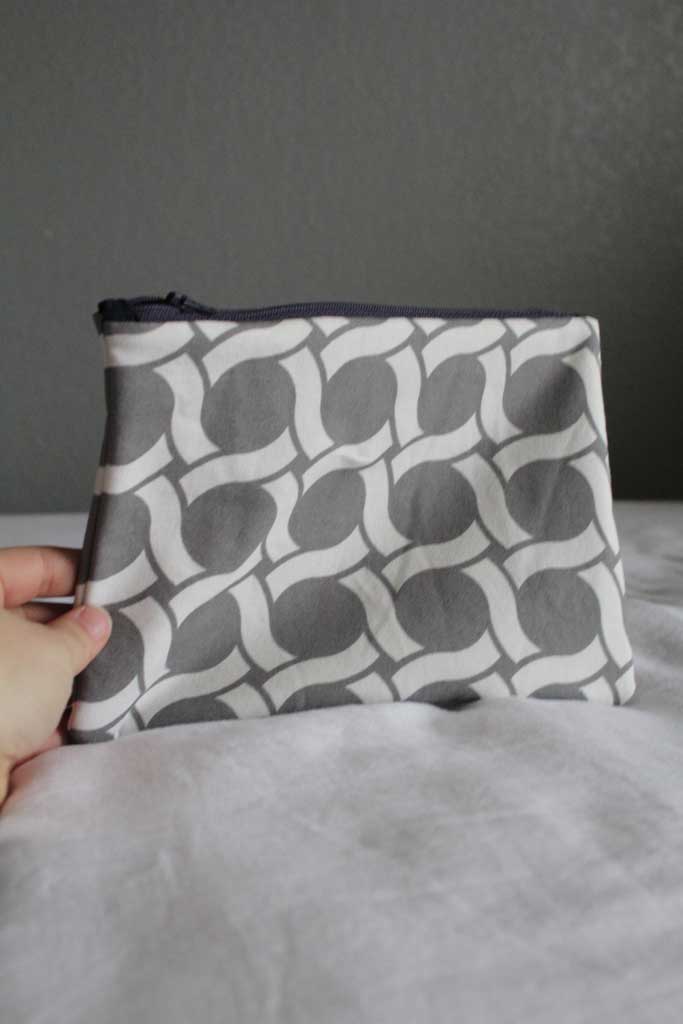
almost a year later and I wanted one, so I decided to make one for
myself and share the process with y’all. Here is the bag:

And here is a pic of them all lined up and filled with goodies for my bridal party:

When I got started on this project I got some great help and fabulous fabric from Sarah’s Fabrics in Lawrence, KS. If you live in Kansas City or Lawrence I highly recommend them… they are a great little shop on Mass St. The gray and white fabric came from there.
Alright, on to the how to, here is what you need:

First up we will prep the zipper. I love the way this looks on the final bag, it gives the little colored stoppers at the end of each zipper. Take your 1.5″x4″ strip of fabric and fold it ‘hot dog style’ down the middle, and run the iron over it so you have a seam in the middle. Then fold each edge in towards the crease you just made with the iron. Now fold it in half on that crease so that your edges are all on the inside. This is a hard step to explain, so I have a picture (I don’t have a picture with the iron because I don’t have three hands, but picture me running an iron over the fabric between each step):

Now take your zipper and cut off the end of it (sorry for the weird lighting on this one… i’m still mastering the whole photography thing):

Now tuck that end of the zipper in between the two folded in sides of your small piece of fabric towards one end of that fabric and sew a line of stitching across it, then cut off the excess. You’ll use that other half for the other end of the zipper. Now it should look like this:
 Cut your zipper off at the other end about an inch shorter than your bag (approx 9″)
 And sew the other half of your small piece of fabric onto
this end of the zipper, repeating the same process. You should now have a
zipper that looks a lot like this:
And sew the other half of your small piece of fabric onto
this end of the zipper, repeating the same process. You should now have a
zipper that looks a lot like this:
 Alright, set that to the side and grab your inside fabric
pieces (solid color) and the interfacing and follow your instructions on
attachment, mine you simply iron on, making sure the dotted side faces
the fabric you are fusing it to. If your fabric has a good side and a
bad side, make sure you are attaching the interfacing to the ‘bad side’.
It will look like this when it is finished:
Alright, set that to the side and grab your inside fabric
pieces (solid color) and the interfacing and follow your instructions on
attachment, mine you simply iron on, making sure the dotted side faces
the fabric you are fusing it to. If your fabric has a good side and a
bad side, make sure you are attaching the interfacing to the ‘bad side’.
It will look like this when it is finished:
 Now comes what I think is the trickiest part of this project,
figuring out which way which fabrics go! I’ve shown you pictures of
each step so hopefully this will be easier for you guys! Place your
outside fabric (the gray and white), good side up, then the zipper
upside down and about 1/2 of the way zipped up and centered between the
fabrics (there will be about 1/2 inch overhang on each side), then the
inside piece good side down, which means the interfacing will be face
up. I didn’t use a zipper foot (mostly because I’m lazy, but also
because I don’t know how). But no worries… its easy to get around.
Now comes what I think is the trickiest part of this project,
figuring out which way which fabrics go! I’ve shown you pictures of
each step so hopefully this will be easier for you guys! Place your
outside fabric (the gray and white), good side up, then the zipper
upside down and about 1/2 of the way zipped up and centered between the
fabrics (there will be about 1/2 inch overhang on each side), then the
inside piece good side down, which means the interfacing will be face
up. I didn’t use a zipper foot (mostly because I’m lazy, but also
because I don’t know how). But no worries… its easy to get around.

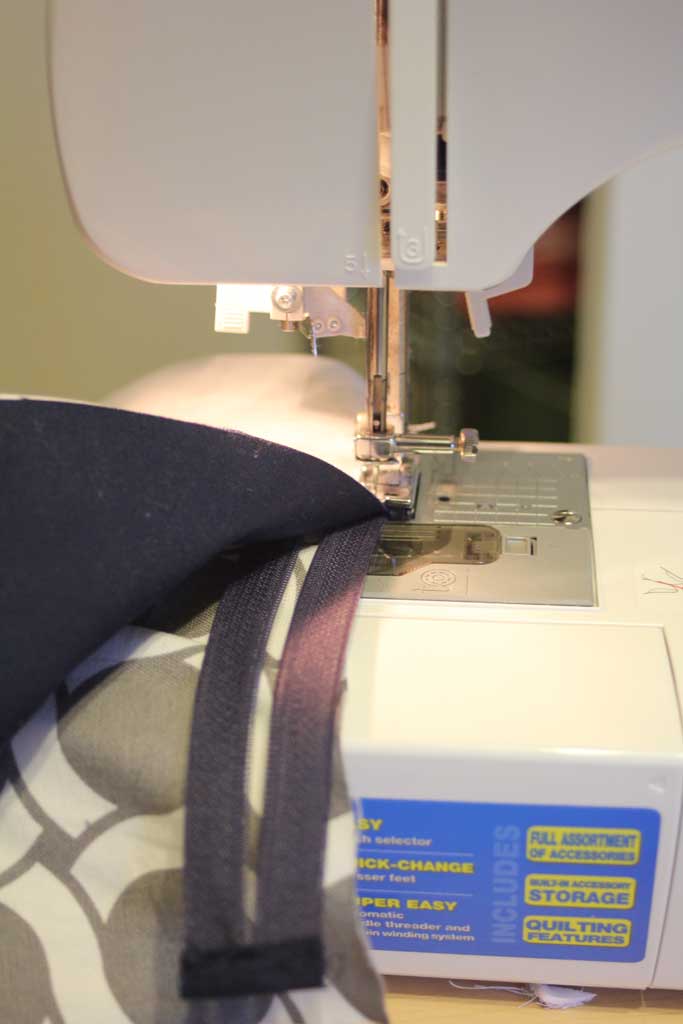
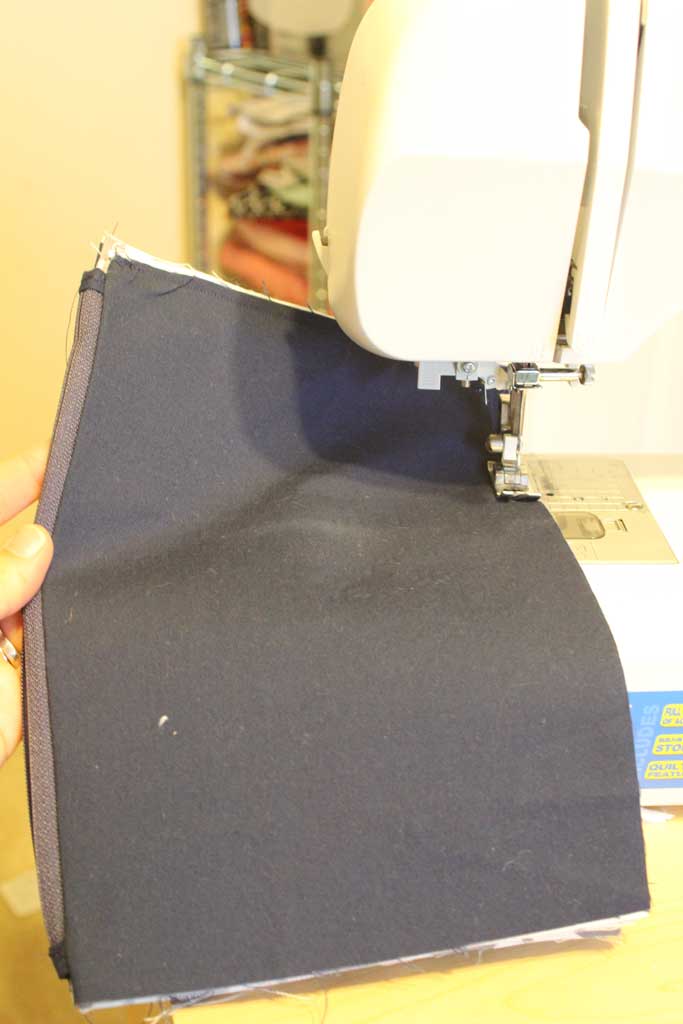
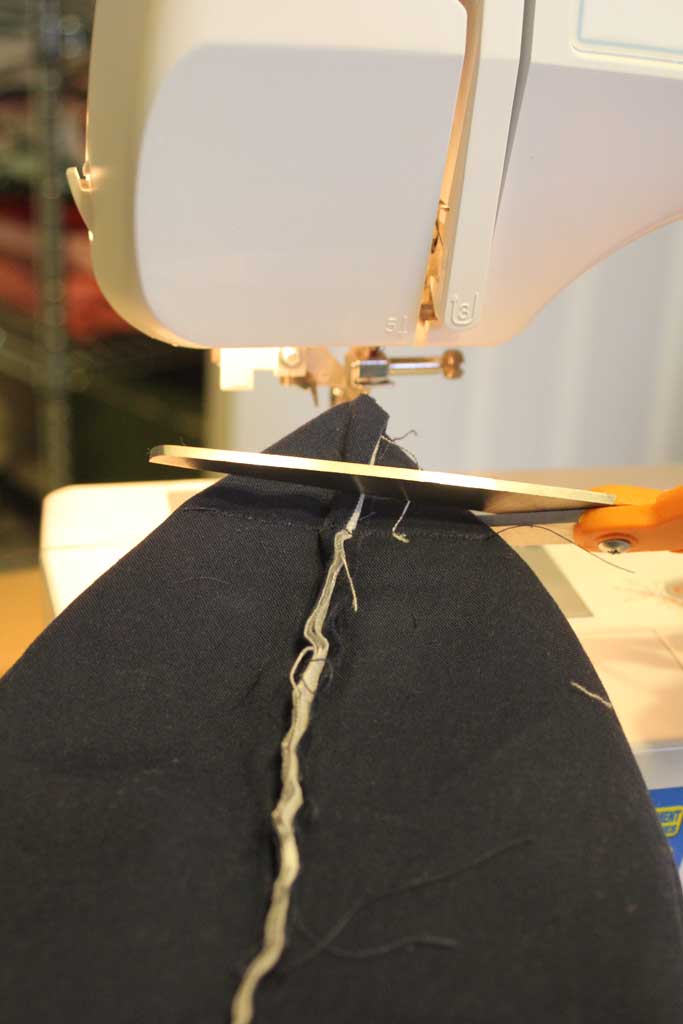
Put it in the machine like I have it laid out above, and stitch down the right side of that zipper until you get to the actual zipper part. Then with your needle down through the fabric so it doesn’t move, lift up your presser foot, slip your hand in between the layers of fabric and move the actual zipper up and around the presser foot (the needle part) so that you can sew through the rest of the zipper (if you don’t the presser foot will run over the zipper and move your seam off of the fabric… trust me).

Now your bag should have one side attached to the zipper, like this:

Move your zipper halfway up again, and get ready to attach the other side, like before your outside fabric goes face up on the bottom, and the solid color fabric face down on the top, but you have to make sure your zipper is face down and the other side is sandwiched in between your new fabric, like this:
 Now just repeat the process from before: sew halfway down,
leave your needle in the fabric, lift the presser foot and move the
zipper to the other side, and sew the rest of the way.
Now just repeat the process from before: sew halfway down,
leave your needle in the fabric, lift the presser foot and move the
zipper to the other side, and sew the rest of the way.
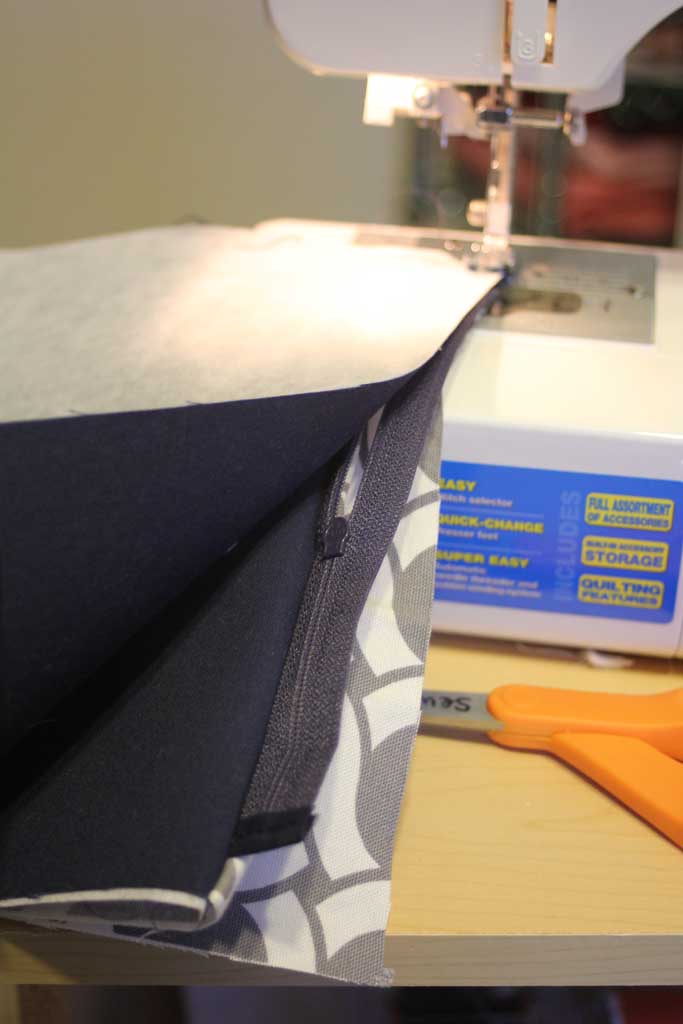
Now your bag should look alot like this:

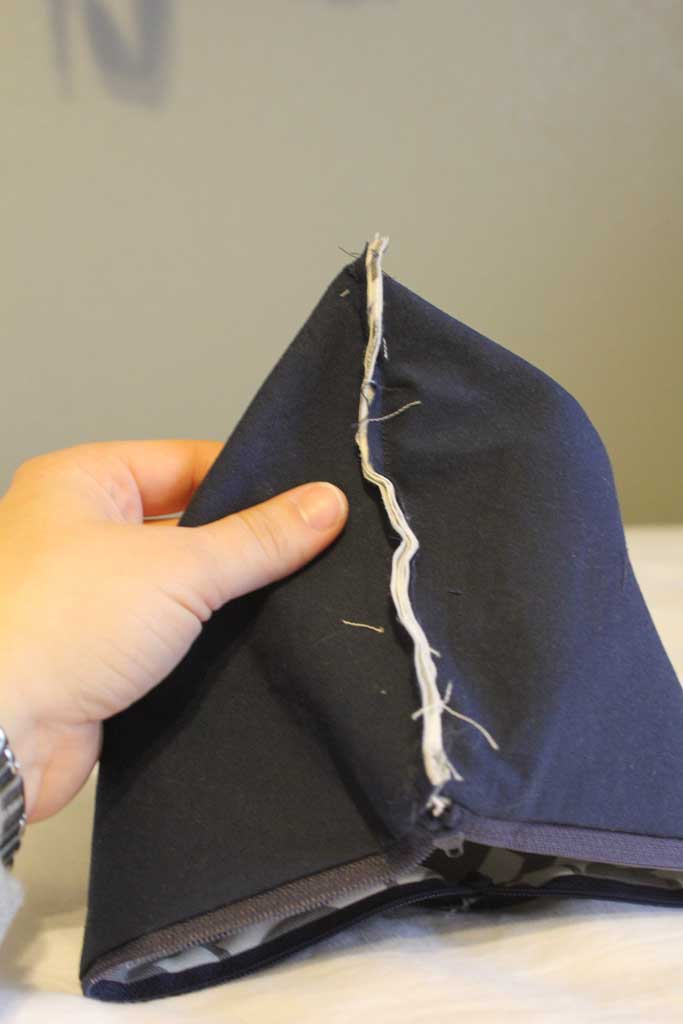
I highly recommend ironing at this stage so that the seams next to the zipper are as flat as possible. Once you’ve done that its time to seal up your bag. IMPORTANT STEP!!! Make sure your zipper is at least partially unzipped. You are about to seal up the other three sides of this, so if your zipper is zipped all the way up, it becomes VERY difficult to open a zipper from the inside and you will be very frustrated with yourself for forgetting this very simple step. Just ask me how I know.
Now, fold the fabric so your outside pieces are facing each other (for mine this means my navy fabric is facing out) and sew all three remaining sides together. Don’t forget to back stitch at the beginning and the end!
 This should be one continuous line, when you get to the
corners just leave your needle in the fabric, lift the presser foot and
move your fabric until your next side is lined up. Once you are done,
trim off any excess pieces (did I mention I’m bad at measuring and
cutting so I frequently have sides that don’t line up perfectly??
Totally acceptable)
This should be one continuous line, when you get to the
corners just leave your needle in the fabric, lift the presser foot and
move your fabric until your next side is lined up. Once you are done,
trim off any excess pieces (did I mention I’m bad at measuring and
cutting so I frequently have sides that don’t line up perfectly??
Totally acceptable)
You have two choices now. You can cut your corners off at an angle like we did for the burp cloths and then turn your piece through the zipper side… see aren’t you glad you left it partially unzipped? This will make it a rectangular pencil bag like this:

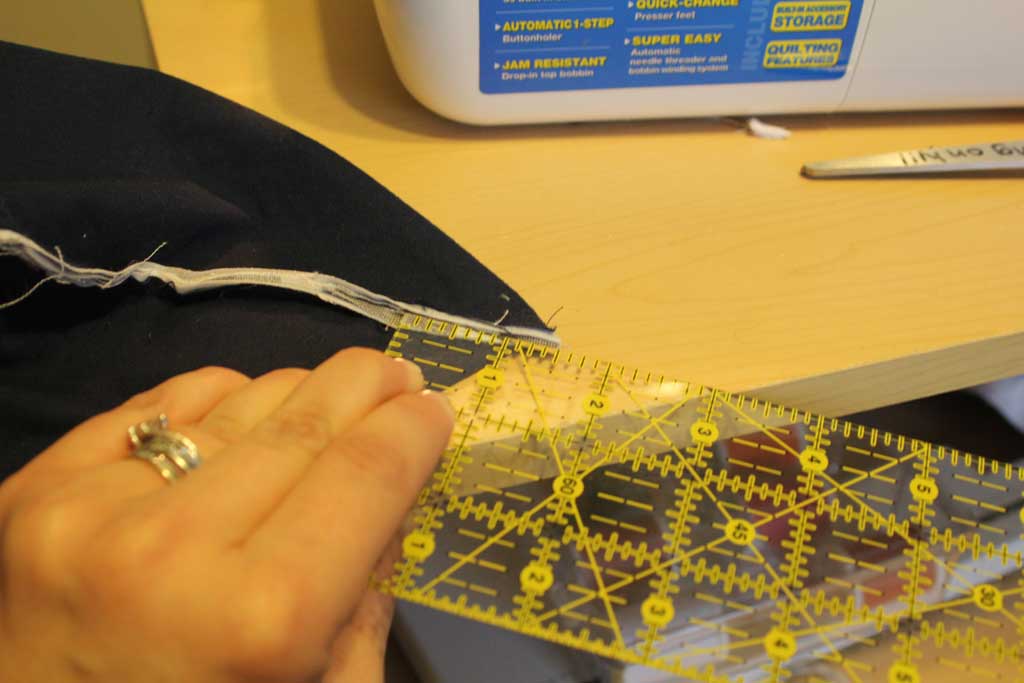
Or you can do another step like I did to make it stand up on its own and look a little more like a makeup bag. For this step, leave it inside out and take one corner and line up the seams so they are on top of each other like this:

Measure about an inch and a half up and stitch a line across it (again, sorry for the weird lighting on a few of these):

Then trim off your excess:

Rinse and repeat on your other corner, now when you turn your bag inside out, it looks like this:

And its the perfect size for makeup, jewelry, etc!
source
And here is a pic of them all lined up and filled with goodies for my bridal party:

When I got started on this project I got some great help and fabulous fabric from Sarah’s Fabrics in Lawrence, KS. If you live in Kansas City or Lawrence I highly recommend them… they are a great little shop on Mass St. The gray and white fabric came from there.
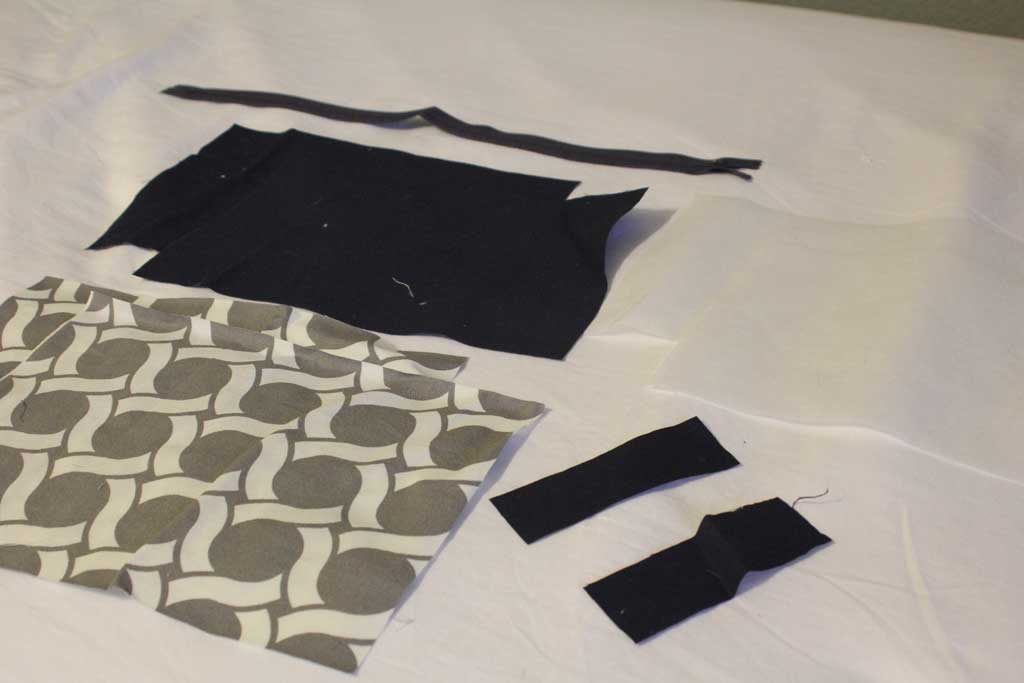
Alright, on to the how to, here is what you need:
- 2- 10″ x 7″ rectangles of patterned fabric
- 2- 10″ x 7″ rectangles of solid print
- 2- 10″ x 7″ of interfacing (I used a medium weight iron on interfacing it makes the bags stiffer so they will sit up on their own)
- a zipper that is longer than 10″
- 1- 1.5″ x 4″ strip of fabric the same color as your zipper. (I show two below… but you only really need one, I just like to have extra in case I goof)
- an iron
- a sewing machine
- thread
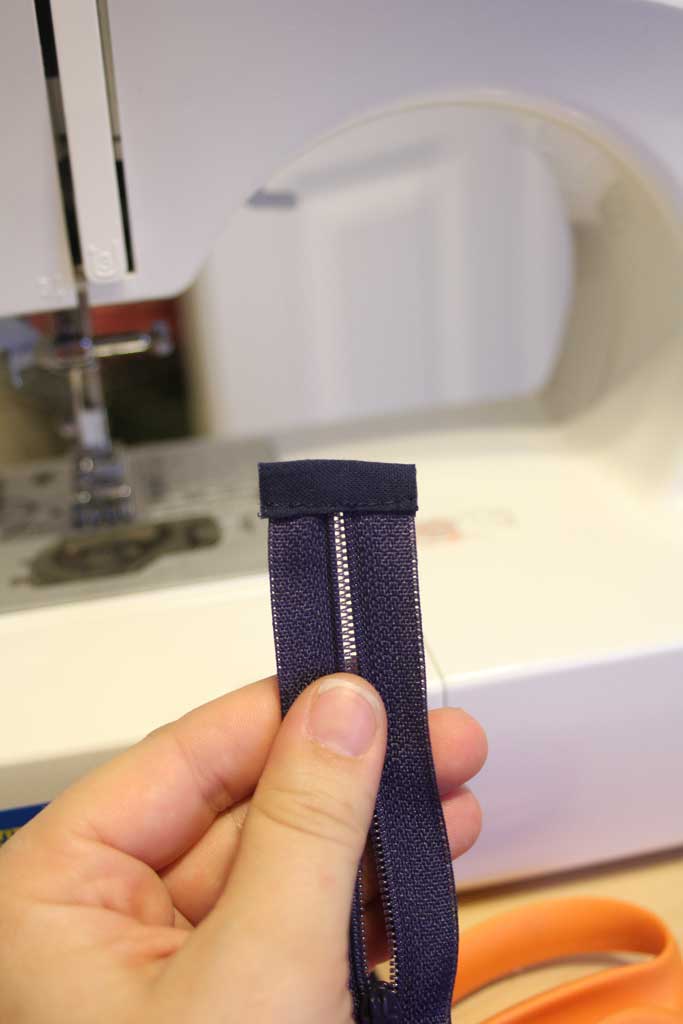
First up we will prep the zipper. I love the way this looks on the final bag, it gives the little colored stoppers at the end of each zipper. Take your 1.5″x4″ strip of fabric and fold it ‘hot dog style’ down the middle, and run the iron over it so you have a seam in the middle. Then fold each edge in towards the crease you just made with the iron. Now fold it in half on that crease so that your edges are all on the inside. This is a hard step to explain, so I have a picture (I don’t have a picture with the iron because I don’t have three hands, but picture me running an iron over the fabric between each step):

Now take your zipper and cut off the end of it (sorry for the weird lighting on this one… i’m still mastering the whole photography thing):

Now tuck that end of the zipper in between the two folded in sides of your small piece of fabric towards one end of that fabric and sew a line of stitching across it, then cut off the excess. You’ll use that other half for the other end of the zipper. Now it should look like this:
 Cut your zipper off at the other end about an inch shorter than your bag (approx 9″)
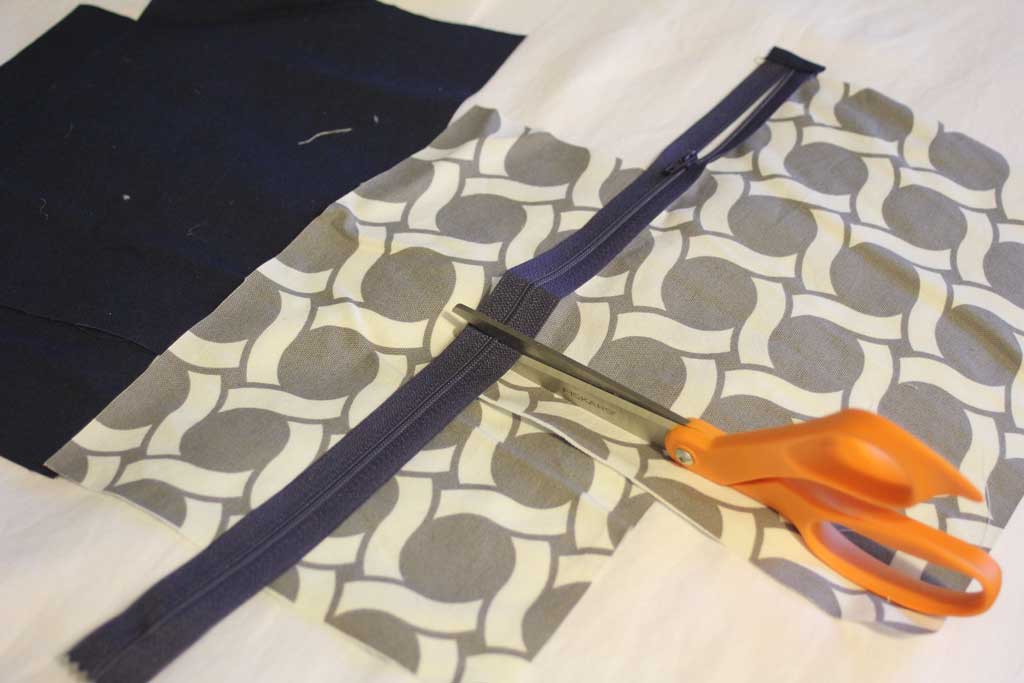 And sew the other half of your small piece of fabric onto
this end of the zipper, repeating the same process. You should now have a
zipper that looks a lot like this:
And sew the other half of your small piece of fabric onto
this end of the zipper, repeating the same process. You should now have a
zipper that looks a lot like this: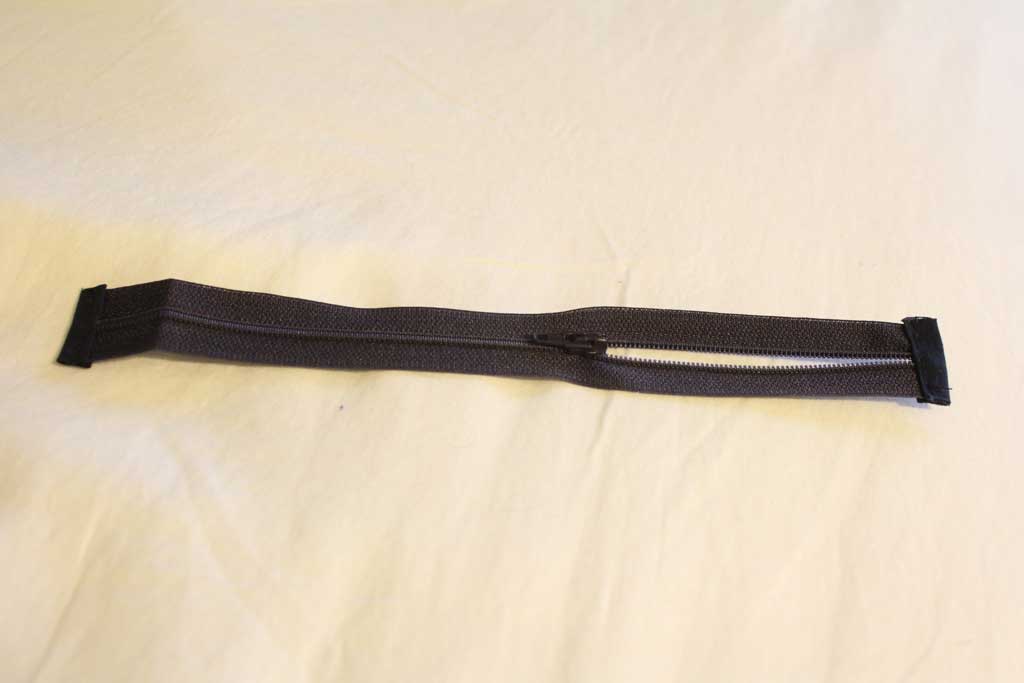 Alright, set that to the side and grab your inside fabric
pieces (solid color) and the interfacing and follow your instructions on
attachment, mine you simply iron on, making sure the dotted side faces
the fabric you are fusing it to. If your fabric has a good side and a
bad side, make sure you are attaching the interfacing to the ‘bad side’.
It will look like this when it is finished:
Alright, set that to the side and grab your inside fabric
pieces (solid color) and the interfacing and follow your instructions on
attachment, mine you simply iron on, making sure the dotted side faces
the fabric you are fusing it to. If your fabric has a good side and a
bad side, make sure you are attaching the interfacing to the ‘bad side’.
It will look like this when it is finished: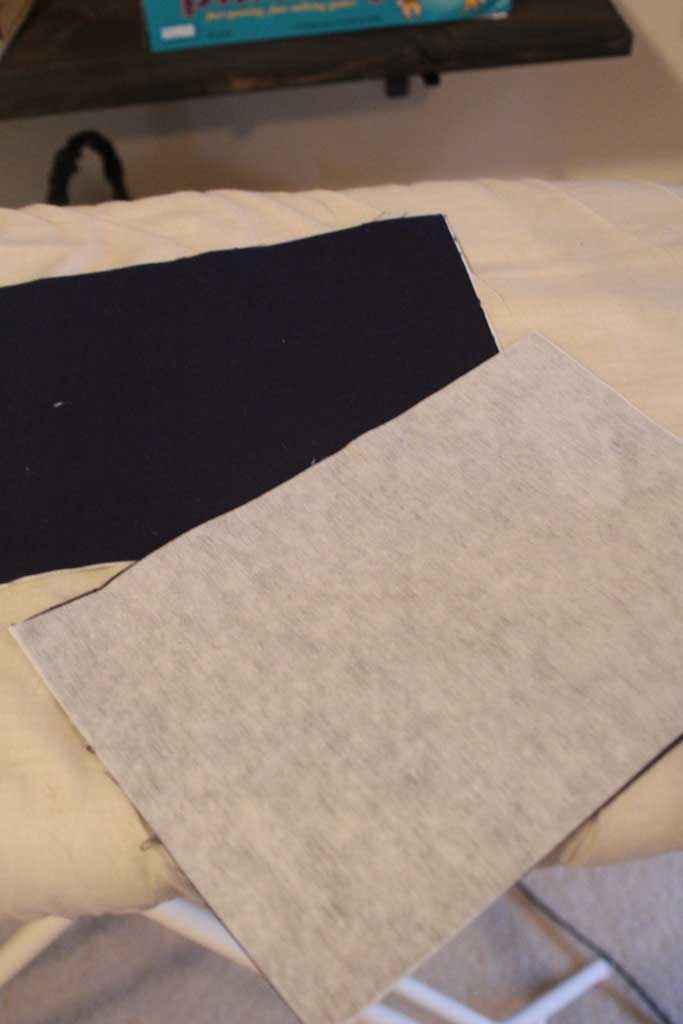 Now comes what I think is the trickiest part of this project,
figuring out which way which fabrics go! I’ve shown you pictures of
each step so hopefully this will be easier for you guys! Place your
outside fabric (the gray and white), good side up, then the zipper
upside down and about 1/2 of the way zipped up and centered between the
fabrics (there will be about 1/2 inch overhang on each side), then the
inside piece good side down, which means the interfacing will be face
up. I didn’t use a zipper foot (mostly because I’m lazy, but also
because I don’t know how). But no worries… its easy to get around.
Now comes what I think is the trickiest part of this project,
figuring out which way which fabrics go! I’ve shown you pictures of
each step so hopefully this will be easier for you guys! Place your
outside fabric (the gray and white), good side up, then the zipper
upside down and about 1/2 of the way zipped up and centered between the
fabrics (there will be about 1/2 inch overhang on each side), then the
inside piece good side down, which means the interfacing will be face
up. I didn’t use a zipper foot (mostly because I’m lazy, but also
because I don’t know how). But no worries… its easy to get around.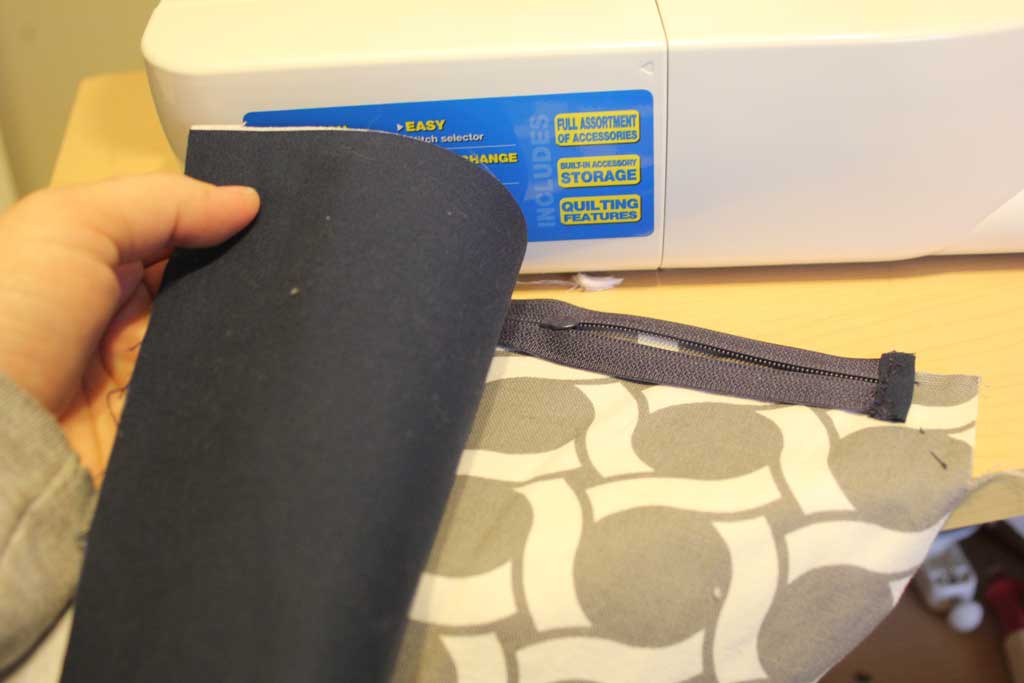
Put it in the machine like I have it laid out above, and stitch down the right side of that zipper until you get to the actual zipper part. Then with your needle down through the fabric so it doesn’t move, lift up your presser foot, slip your hand in between the layers of fabric and move the actual zipper up and around the presser foot (the needle part) so that you can sew through the rest of the zipper (if you don’t the presser foot will run over the zipper and move your seam off of the fabric… trust me).
Now your bag should have one side attached to the zipper, like this:

Move your zipper halfway up again, and get ready to attach the other side, like before your outside fabric goes face up on the bottom, and the solid color fabric face down on the top, but you have to make sure your zipper is face down and the other side is sandwiched in between your new fabric, like this:
 Now just repeat the process from before: sew halfway down,
leave your needle in the fabric, lift the presser foot and move the
zipper to the other side, and sew the rest of the way.
Now just repeat the process from before: sew halfway down,
leave your needle in the fabric, lift the presser foot and move the
zipper to the other side, and sew the rest of the way.Now your bag should look alot like this:

I highly recommend ironing at this stage so that the seams next to the zipper are as flat as possible. Once you’ve done that its time to seal up your bag. IMPORTANT STEP!!! Make sure your zipper is at least partially unzipped. You are about to seal up the other three sides of this, so if your zipper is zipped all the way up, it becomes VERY difficult to open a zipper from the inside and you will be very frustrated with yourself for forgetting this very simple step. Just ask me how I know.
Now, fold the fabric so your outside pieces are facing each other (for mine this means my navy fabric is facing out) and sew all three remaining sides together. Don’t forget to back stitch at the beginning and the end!
 This should be one continuous line, when you get to the
corners just leave your needle in the fabric, lift the presser foot and
move your fabric until your next side is lined up. Once you are done,
trim off any excess pieces (did I mention I’m bad at measuring and
cutting so I frequently have sides that don’t line up perfectly??
Totally acceptable)
This should be one continuous line, when you get to the
corners just leave your needle in the fabric, lift the presser foot and
move your fabric until your next side is lined up. Once you are done,
trim off any excess pieces (did I mention I’m bad at measuring and
cutting so I frequently have sides that don’t line up perfectly??
Totally acceptable)You have two choices now. You can cut your corners off at an angle like we did for the burp cloths and then turn your piece through the zipper side… see aren’t you glad you left it partially unzipped? This will make it a rectangular pencil bag like this:
Or you can do another step like I did to make it stand up on its own and look a little more like a makeup bag. For this step, leave it inside out and take one corner and line up the seams so they are on top of each other like this:
Measure about an inch and a half up and stitch a line across it (again, sorry for the weird lighting on a few of these):
Then trim off your excess:
Rinse and repeat on your other corner, now when you turn your bag inside out, it looks like this:
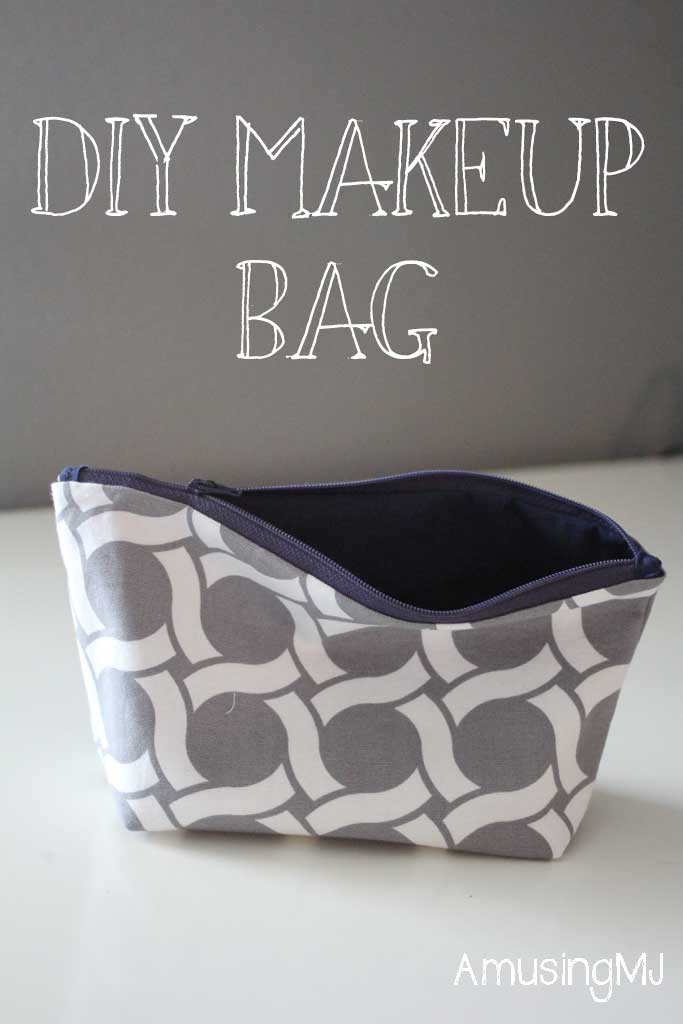
And its the perfect size for makeup, jewelry, etc!
source
Fillyano Flat

Fillyano Flat
IDR 259.900
Pertanyaan & order bisa lewat:
Direct message account ini atau
Line@: @misyellestore (pakai @)
WA : 0851-0599-9158
Ayo tunggu apalagi sis? 😊
IDR 259.900
Pertanyaan & order bisa lewat:
Direct message account ini atau
Line@: @misyellestore (pakai @)
WA : 0851-0599-9158
Ayo tunggu apalagi sis? 😊
Monday, 11 December 2017
Harbolnas Misyelle X Berry benka
.
Dapatkan extra diskon tambahan hingga 30% untuk produk Misyelle setiap harinya! Promo berlaku hanya 12 - 14 Desember 2017.
.
Klik untuk belanja :
http://bit.ly/2kl3nlp
.
Siap-siap belanja dengan DISKON s/d 95% dan GRATIS SAMSUNG J7+ untuk top spender!
.
#belanjaHARBOLNASberrybenka
#berrybenka #misyelleberrybenka
Misyelle 4th Online Anniversary

FREE Voucher IDR 100.000 khusus untuk kamu, Misyellelovers!
Belanja apa saja dan dapatkan potongan langsung Rp 100.000
Shop Now : www.misyelle.com
Promo hanya berlaku 11-13 Desember 2017
Misyelle Store Christmas Sale

Untuk menyambut natal, Misyelle Store lagi ngadain diskon loh! Yuk buruan cek ke counter Misyelle Store terdekat, dan dapatkan semua koleksi terbaik Misyelle khusus untuk kamu. Jangan lupa ajak teman, pacar dan keluargamu ya, Misyellelovers!
Friday, 1 December 2017

Misyelle Christmas Collection

www.misyelle.com
IG : misyellelovers
FB : misyelle store
BBM Pin : 322504F4
FB : misyelle store
BBM Pin : 322504F4
Thursday, 30 November 2017
Misyelle New Christmas Collection

Don't miss it!
Misyelle new collection will be uploaded soon. Stay tune, Misyellelovers :))
Misyelle new collection will be uploaded soon. Stay tune, Misyellelovers :))
Tuesday, 28 November 2017
Delice Sling

Delice Slings
Tas Misyelle sling ini memiliki design yang simpel namun memikat. Sangat cocok untuk
kegiatan sehari hari. Gratis mini pouch. Pada bagian dalam terdapat 2
kantong untuk tempat handphone dan 1 kantong beretsleting tambahan.
Tersedia dalam 2 warna black dan brown
Misyelle Delice Sling hanya
IDR 269.900
www.misyelle.com
IG : misyellelovers
FB : misyelle store
BBM Pin : 322504F4
FB : misyelle store
BBM Pin : 322504F4
Misyelle Pepita Sling

Tas Pepita Sling dari Misyelle dengan detil kantong di bagian depan. Memiliki tali panjang
yang dapat diadjust dan dilepas. Pada bagian dalam terdapat 2 kantong
untuk tempat handphone dan 1 kantong beretsleting tambahan.
Pepita Sling
IDR 249.900
Pertanyaan & order bisa lewat:
Direct message account ini atau
Line@: @misyellestore (pakai @)
WA : 0851-0599-9158
Ayo tunggu apalagi sis?
www.misyelle.com
Saturday, 25 November 2017
Misyelle Desty Tote

Misyelle Desty Tote dengan desain simpel, memiliki detil rumbai dibagian depan.
Pada bagian dalam terdapat 2 kantong untuk tempat handphone dan 1
kantong beretsleting tambahan. Tersedia dalam 2 warna mocca dan grey
www.misyelle.com
Desty Tote
IDR 319.900
Pertanyaan & order bisa lewat:
Direct message account ini atau
Line@: @misyellestore (pakai @)
WA : 0851-0599-9158
Ayo tunggu apalagi sis?
Desty Tote
IDR 319.900
Pertanyaan & order bisa lewat:
Direct message account ini atau
Line@: @misyellestore (pakai @)
WA : 0851-0599-9158
Ayo tunggu apalagi sis?
Friday, 24 November 2017
7 Styling Tricks to Look Chic in a Smart Casual Dress Code
It’s already
hard enough to identify the lines that define a ‘smart-casual’ attire.
It’s even harder to make sure that you look chic while staying
within the dress code. But don’t let that challenge stop you from making
sure that your outfit remains in style. There really is no formula to a
smart casual outfit so get creative with the restrictions and go out of
the box. Just remember, keep your look simultaneously professional and
fun! It can be quite tricky to find a balance between casual and
professional, so here are some styling tricks to help you navigate
around the confusing dress code like a true fashion girl.

Photo via @thriftsandthreads
A blazer paired with a turtleneck top
looks out-of-this-world chic and smart at the same time. Sport a pair of
athleisure-inspired paneled pants to add a dash of casual to the
overall look.

Photo via @notjessfashion
Nothing looks more professional than a
white collared top, so add a little flair to it by layering a plaid
statement-making dress. Top it all off by accessorizing with
complementary hues.

Photo via @lusttforlife
Smart casual should never equate to boring, so play it up with no-shoulder tops, puffy sleeves, and pointy high-heeled mules.

Photo via @kirstynkonig
Pair a slitted midi dress with a good pair of crisp slides and and a sleek belt bag for a refined but relaxed ensemble.

Photo via @cremedemichelle
Skinny jeans and ankle boots look extra chic together. Throw in a long robe and a mockneck top for a more polished look.

Photo via @songofstyle
Play with patterns and bold colors to
spice up your ensemble, red and plaid go well together for a cross
between corporate and casual.

Photo via @natalieoffduty
Another hack to acing smart casual: put
together corporate pieces in coordinating patterns and prints! Make a
blouse and trousers combo look extra chic with a print-on-print
ensemble.
Subscribe to:
Posts (Atom)