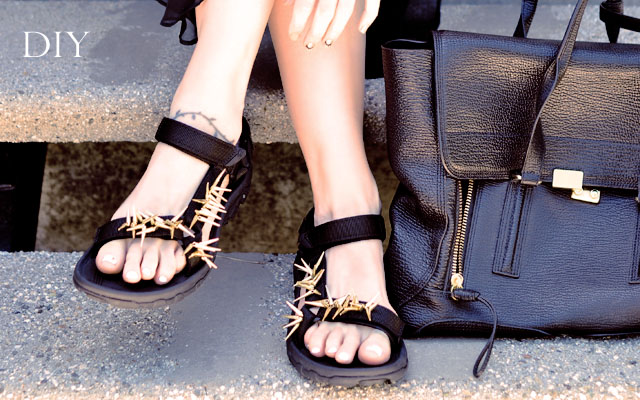
Shoe DIYs are my absolute favorite. In fact, my very first ever DIY on this blog was my DIY Louboutin Petal sandals back in 2009 and I’ve been at it ever since. I get really excited about great shoe diys, and these are my new faves, and oh so wearable… they’re the perfect party shoe.
Inspired by these gorgeous Bow T-Strap Heels by Nicholas Kirkwood for Roksanda Ilincic, Spring 2014{originally $880, there’s one size 36 left on sale for $265}, I got busy on my own pair to DIY up and it didn’t take long at all figuring out the logistics of the design. My one worry is that the glue won’t hold, though this stuff is pretty powerful, I always prefer to stitch things together if I can. I’m thinking they may not be the best option in the rain, but I don’t wear my suede heels in the rain anyway, so this was a perfect pair of shoes to add this pretty design to. They’re Jean Michele Cazabat from a few seasons ago, but the shape and heel have a hint of my inspiration’s, though not nearly as exaggerated.

Another worry I have is that the anklet and bow will slip to the sides and I may remedy that, if it happens, by adding a loop to the upper heel and weaving my ankle strap ribbon through it so that it says put, leaving the closure on the open side so I can still get in and out of them. I think they’re pretty without it, and so far, they’ve stayed front and center, but if they do need it, I’ll add it later.
But either way, I’m loving the pretty t-strap ankle bow detail, which is perfect for the holidays and with a hint of ’60s. They may actually be really pretty in white or ivory {or satiny blue} as wedding shoes.
I’m pretty sure you can use flats for this DIY as well as heels, but I’d definitely stay in the suede or velvet category so your glue adheres better AND so the the ribbon blends well and gives them a luxe feel when finished because THEY ARE DIVINE.
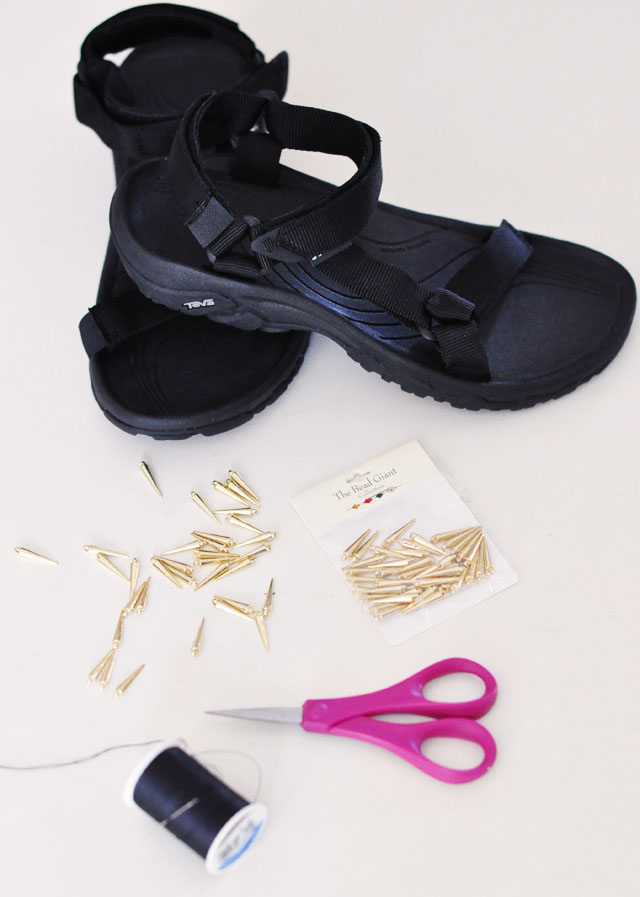
Here’s What You’ll Need…

- A pair of suede or velvet heels OR flats {mine are Jean-Michel Cazabat 2009/10 -see them in this outfit post}
- Grosgrain {or velvet} ribbon… I matched my ribbon color to my heels to match my inspiration, but contrasting colors may be pretty too like hot pink or classic red, shimmery gold or silver {that’s opaque enough that you can’t see the glue through it} or navy, green, burgundy even.
- Matching needle & thread
- Scissors
- E6000 clear adhesive
- Velcro {self-adhesive for immediate placement – then hand-stitched in place for extra security}
Steps…

1. Try on your shoe and measure how much ribbon you need from tip to ankle, allow a few inches extra on either end for mistakes, and cut one for each shoe and set to the side.
2. Create a 2″ bow with one end sticking out by looping the ribbon over and under itself. You’ll need from 6-8″ of ribbon for this, unless you want your bow larger. You can also choose not to have one end sticking out, but I love the added detail.
3. Run a few stitches through the center of your bow to hold it in place. Trim you ribbon end into a V by folding it in half and cutting diagonally downward into the ribbon end. Singe the ends with a lighter to keep it from fraying.
4. Place the backside of your new bow UP and at the top of your T-strap ribbon {from step 1}, fold the top of your long ribbon over the bow and stitch it in place. Leave the entire BACK LOOP open, stitching only beneath it and at the very bottom to keep the bow in place.

5. You should now have two long ribbons with bows at the top.
6. Now, measure around your ankle and cut two “ankle straps”, leaving an inch or so excess just in case.
7. Singe the ends of the ribbon to keep from fraying.

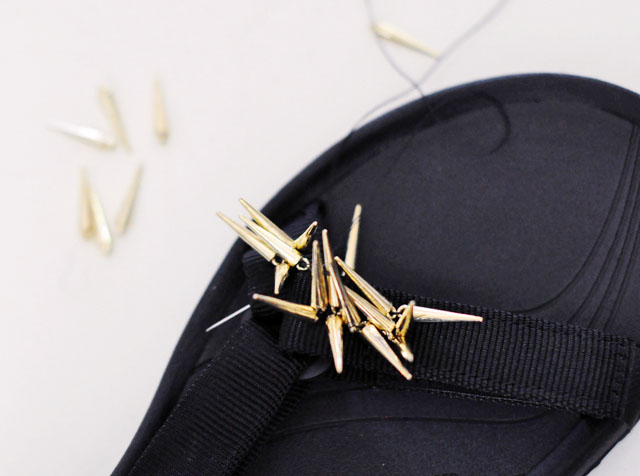
8. Run your ankle strap ribbons through the LOOPS in the back of your bows.
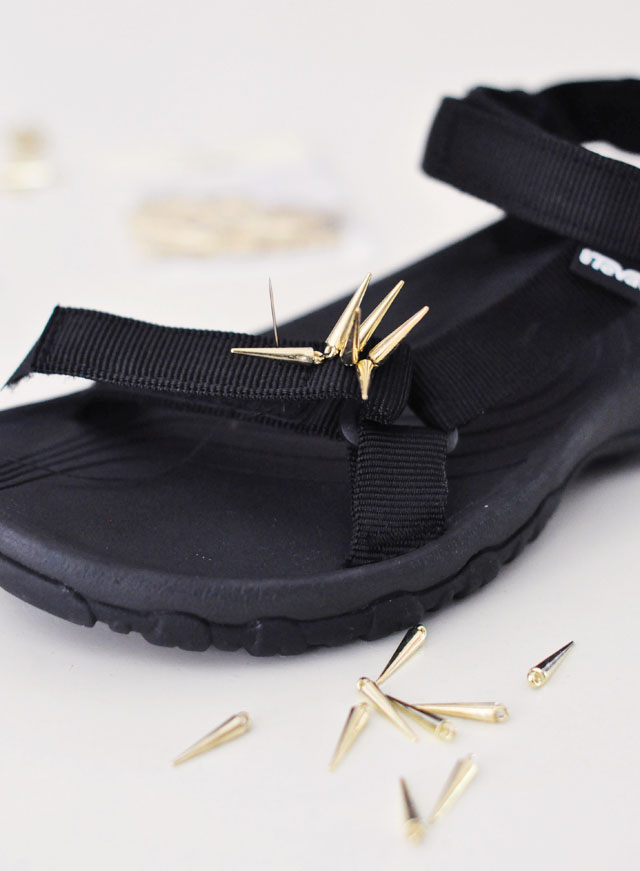
9. Cut your adhesive VELCRO to the size of your ribbon, and about 3/4″ in length.
10. Wrap your ankle straps around your ankle and place your velcro on your ankle straps where they feel most comfortable {for now} and set in place.

11. Try on your shoe with your ankle straps… go stand in front of a mirror so you can place them exactly where you want them. What you may think is center may not be exactly where they look the best, so check em out first.
12. Also make sure that they’re tight enough/pulling down at your ankle straps just a smidge so that your T-straps only buckle when your foot bends and stays taught when your foot is straight.
13. In a ventilated area {this stuff is STRONG} glue your ribbon to the top/toe of your shoes… I used Q-tips for easy application. NOTE: Don’t use so much that is squeezes out the sides of your ribbon. It dries clear, but will still show up on your suede or velvet.
14. Let dry over night.

15. Once dry, try on your shoes with your ankle straps and walk around a bit like you’re in a shoe store.
16. Decide exactly where you want your velcro closure to be, remove/adjust your adhesives, then hand-stitch in place, leaving the smallest stitches visible on the front/top of the ribbon.

17. Trim the excess ribbon at the tip of your shoes and singe the edges…. Dab a little more E6000 to make sure they’re good and on there and let dry over night.
And… Voila!


source is here


 {but also hints at