Showing posts with label discount. Show all posts

Friday, 16 October 2015

DIY PRADA INSPIRED PLATFORM SNEAKERS

Recently I had the pleasure of working with FOAM Magazine on a DIY project for their magazine (see here for their online post), a pair of raffia embellished creepers (aka platform sneakers).

I know I wasn’t the only person who fell in love with the prada platform brogues complete with raffia edging. I decided to get crafty and have a try at making a similar pair. Never one to copy something exactly, I made a black and white version to pay homage to the A/W monotone colour trend, and stuck with only a slight platform – you can always do more of a platform by adding more layers of foam if you like.
You’ll need:
A pair of lace up canvas sneakers (try a cheap shoe store or supermarkets)
Foam for the platform – I used a pair of old flip flops
2 shoe soles – I cut them off a very old pair of sneakers but you can also get them from a cobbler or buy an extra pair of canvas sneakers in a different colour.
Flexible glue and a hot glue gun
Raffia – I used plaited straw raffia from a craft store.
A stanley knife and sandpaper for adjusting shoes/foam for the platforms so they fit together.

Step 1. Glue the sole and the foam together using the flexible glue. Then glue the sneakers to the foam.
Step 2. Press the three layers together and let dry overnight. I weighed mine down with some bricks to apply the right amount of pressure.  
Step 3. Once the glue has dried, hot glue two layers of raffia around the edge of the shoes to completely cover up the foam. Make sure any join of the raffia is centred at the back of the shoe.
Step 4.  For a finishing touch I threaded the sneakers with the black laces from the old shoes I took the soles from. You could use any colour laces – neon would be fun!
And voila, your very own raffia embellished creepers!
Wearing: gifted J Brand Jeans, DIY raffia creepers, mens zara singlet (sorry boyfriend’s friend, you’re never getting it back), DIY gold pendant (tutorial to come!), Ebay Cat Eye sunglasses, studded pouch bag.

Monday, 21 September 2015

Wonderful Zipper Bag Idea – DIY

zipper-bag-4
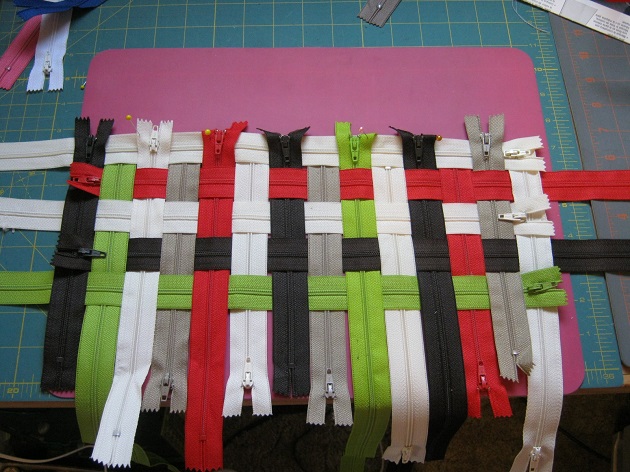
In creating this lovely purse that is woven out of zippers, the bags that are often seen in the airport gift shops were the  main point of inspiration. You can make your own using the colors shown or any combination that works best for your outfits.
You will need:
– zippers in different colors;
– glue;
– pins;
– scissors.
First, on a flat surface, lay out and weave the zippers according to the images shown. Get the sides of the zippers together and secure them temporarily by pinning them. Starting from the bottom corner, glue the ends of all the zippers making sure you maintain a consistent pattern of the woven by trimming off the ends. When the bottom part is woven and glued you can take off the pins and trim the end of each zipper, weave in the ends on the top and the raw edges under a vertical zipper. Next, wrap the top ends of the vertical zipper’s margins over the top horizontal zipper and glue. Afterwards, take two zippers, cut them about 10” and glue them to the underneath top edge of the tote. To finish the bag, cover up all raw ends by taking any left scraps of zippers and glue them to the zippers around the inside guideline of the tote. Have fun!


zipper bag 1


zipper bag 2


zipper bag 3

Monday, 22 June 2015

DIY EMBROIDERY THREAD WRAPPED EARRINGS

DIY EMBROIDERY THREAD WRAPPED EARRINGS

This is a special guest post was created by Anne Weil of Flax & Twine. Find more handmade lovelies, simple design and beautiful inspiration on her inspiring blog.
——-
Hi everyone!  I’m so happy and honored to be a guest poster on Creature Comforts today. I’ve been following along with excitement as Ez has shared her big move with us. Having just moved across the country myself, I am empathetic to the anxiety and discombobulation that comes along with the thrill of a moving adventure. To pack up all your stuff and leave your known environment, only to arrive in a place that needs a lot of settling can overwhelm anyone! Ez has handled this transition seamlessly and gracefully on the blog. She makes it all look so easy. Nonetheless, I am hoping this post eases her blog burden ever so slightly in the transition. I adore this fun jewelry tutorial. I hope you do, too!
I originally made a neon green version of these hoops for an 80′s Halloween party­–perfect under the black lights. When I went to pick colors for this tutorial, however, I pulled this more gentle color palette with a punch of black. I think it’s so lovely. These hoops are simple to make, yet such a fun splash of hand made in your wardrobe. Add the ability to customize every pair and you might just not be able to stop making them. I adore these little black and white ones.
These hoops make for a fabulous last minute, personalized gifts, too!  Here’s the tutorial:
Supplies needed:
  • Embroidery thread (I suggest DMC 6-strand floss for a smooth finish)
  • Inexpensive hoop earrings (I found these at Target)
  • Craft glue
  • Scissors
DIY Embroidery Thread Wrapped Earrings
Cut 40” of chosen embroidery thread colors for a large hoop, less for smaller hoops. If you place the hoops in your ear before you start, it will help you decide where to change colors and place the majority of your design color work (remove hoop from ear before next step).
Start by placing a small bit of craft glue at the end of the hoop.
DIY Embroidery Thread Wrapped Earrings
Take desired embroidery thread colors and line them up parallel to the hoop, placing the end of the thread in the bit of glue. Choose the thread color you want to start with and begin wrapping it around the hoop…the other colors you aren’t using they go along for the ride (make sure they are being hidden by the thread color that you want to have showing). Keep wrapped thread snugly side-by-side so you can’t see the hoop or other colors underneath.
When you want to change colors, drop the first color parallel to the hoop and start wrapping with the next color you’d like. Repeat to change colors again. Change as many times as you’d like.
DIY Embroidery Thread Wrapped Earrings
When you get to the end, place another small bit of glue. Wrap thread directly over that glue, using your finger to wipe away any excess. Trim the embroidery thread colors that you are not using first as close to the hoop as possible. Then place a little extra glue to secure the remaining thread over the ends of the other colors, and trim excess. Repeat the finishing process on the other side of the wrapped hoop. Repeat full process for your other earring. Voila!
To create the striped earrings, simply wrap the embroidery threads together at the same time, as if they were one. Keep them in the same alignment as you wrap, and finish with the same process as used above.
So fast, easy and fun! Happy Hooping!

Friday, 15 May 2015

Misyelle BIP on SALE


Discount up to 30% off at Misyelle BIP
Di long weekend ini, yuk ajak teman - teman atau keluargmu ke Misyelle BIP, karena sampai tanggal 17 Mei 2015 bakalan ada promo discount di Misyelle BIP!
So, buruan ke Misyelle BIP

Misyelle Bandung Indah Plaza
Lantai 2

Thursday, 26 March 2015

Street-Style Shopping: Why You Need a Flight Jacket This Spring


Fall’s top trends ranged from gothic black to sparkling jacquards, but outside the shows it was all about the simple, androgynous flight jacket. Olive toppers lent a utilitarian vibe to jeans and dresses alike, but Ursina Gysi may have worn it best with her mash-up of menswear patterns. Get a similar look with our three picks below.


Yigal Azrouël jacket, $2,701, Buy it now; Saint Laurent sweater, $890, Buy it now; Maison Margiela pants, $675, Buy it now

Thursday, 26 June 2014

Misyelle's Platform Shoes


We're proudly present our newest shoes collection: so cute, so cool and so fashionable flatform, Cardora SP. This shoes can be order at our website.

Sunday, 27 April 2014

Emma Roberts Pink Blazer

We're so inspired by Emma Roberts style when she visited 'Late Night with Jimmy Fallon' show. She was so gorgeous with black shirt and pink blazer! So we give you, Misyellovers, how to look like her. Here they are!

Thursday, 12 December 2013

Selamat Hari Belanja Online Nasional!


Hai sista, untuk menyambut hari belanja online nasional, yuk buruan belanja ke website misyelle! Karena sampai dengan tanggal 18 Desember 2013 Misyelle memberikan diskon 20% OFF ALL ITEMS untuk semua barang dengan harga normal.
Kamu bisa akses halaman order untuk mengorder produk - produk Misyelle. So tunggu apalagi sista? Buruan di order sebelum kehabisan ya!

Happy shopping!

Love,


Misyelle